Saturday 29 November 2014

100 Days - Game Over...

Well, the 100 days challenge finished back in October, and I must say it does feel like a big weight has been lifted.  The live exhibition has been - compiled a small handful (around 9) slides of work for their projector (there was a limit to the physical space - a slide show was the next best thing).

It was a great event held at local art gallery Thievery studio back in October, loaded with visitors and some really amazing and varied work from many of the locals that took part in the event.

Wednesday 6 August 2014

800 bits - 27 days later...

I've made it 27 days so far - and I have to say I impress even myself in just how many small CG projects I've managed to pull out of my hat so far.  I thought its worth a short catch up on some of the things that I've done/used/etc to get me this far.

Before I do, I felt its worth also mentioning a fairly amusing comment I got from someone who spotted my work online.  They thought I'd been posting up photographs - and said that I should really make them look 'less real and more 3D' otherwise nobody would realise I was creating 3D images...

Its not often I will hear someone tell me that they think it looks too real and ask me to make it look more computer generated.  Too funny, but I know where they were coming from on an artistic direction.

"This is too real... Make it less real so its obvious that its fake"

Its all in the software

For this challenge I decided to use LightWave rather then Maya.  Originally I thought it could be a great challenge to pull this off with Maya (having taught Maya exclusively for the last 4 or so years) but knowing the amount of time that some areas of Maya's workflow take was enough to warrant going back to my roots (as it were).

There are also some tools and features that are just not found in Maya, and these would allow me to get what I wanted at the quality I wanted with the tight time frames of a daily project.

What took the most time?

In the last few images, a series of isometric-styled computer hardware renders, production time and rendering can be done in 1 to 1.5 hours.  That's because they are comprised of simplified iconic models with basic colour textures.


However for the first 20 or so, an average of 3 hours was normal with some of the more complex ones taking up to 5.  These I attempted to go for a more complex realistic visual, which is why the time was so vastly different to the more recent projects.

In general, my gut feeling is usually 10% modeling and 90% everything else.  In this case, modeling objects was more around 15%.  Where the most effort seemed to go was on the composition, lighting and rendering.  Surfacing didn't take as long (with fairly low amount of Photoshop effort required - but more about that later) for most things, however the amount of additional tweaking I would do while rendering was where this would increase.

Hmmm, deciding on an angle...  Tricky...


It takes a surprisingly long time to get that shot just right, and often the shot I had originally envisaged didn't look as great on screen once it was rendered - which meant a lot of adjusting and testing.  However this is the area where LightWave really shined...

Don't over-model...

The tip of the day - just model what you see in shot.  For instance in the first image I produced of a ZX81 I never modeled any of the sockets or insets of the machine because they weren't seen - and I simply positioned the cables to sit in the correct locations.

Another example here is a BBC computer where the image rendered was of the BBC logo in the top-right corner.  Did I need to model every key?  Nup...

Model what's seen, not what you think you might see...

Bumps, bumps, bumps...

A lot of 80's computers were built with plastics, and as we know, not all plastic surfaces are smooth and shiny.  This is where adding bumps to the surface helps break up the surface and simulates the appearance of these types of materials - and I can honestly say that I did this with literally every project (given just how much plastic was involved obviously)

It may be tiny, but its essential to getting the look
As I said, this wasn't as time consuming as the cinematographic aspect of each project.  One reason being that I made use of a lot of procedurals for adding extra texture to plastics and other types of surfaces through their bump channels.

Bumps, bumps and more bumps...


I also took advantage of LightWave's gradients to assist in controlling some of these to behave the way I needed them.

Using a slope-driven gradient let me produce smooth edged keys on the BBC

Cameras

To pull off some shots, many of the scenes were fudged.  That is, elements are moved, scaled and rotated to suit the shot and assist in making effects like fogs and depth of field behave the way that you need them to.  Its pretty common in CG to 'work to the camera' with anything - its often the only way to pull off many shots.

Tiny tapes, HUGE TV set, fish eye lens and fog to haze it out in the distance

I also took advantage of a Photoreal camera type that allowed me to apply a lens profile to the render to generate a true fish-eye effect.  While that effect can be faked with Photoshop, you won't get quite the same result as a camera that sees the scene around it by processing the render through a lens.

Depth of field can also be viewed in real time (and very quickly) in the viewport, and that assisted a lot in fine tuning the final effect.

DOF preview in real time helped a LOT in getting the shot

Themes

I knew I wanted interesting interesting ways to display items, and while camera angles and various rendering styles are one thing, I figured I'd also try playing with how to interpret the ideas.  One in particular was when I wanted to produce something to represent the arcade game Dig Dug.  Originally I'd thought all the video game related artwork would be sprites built from 3D cubes (which can look cool) but in this instance I decided to try something different.

We'd been talking at work about post-it artwork just the day before this piece was done. In the last building we were, I'd drawn up some Defender sprites on the windows with post-it notes...  And I figured why not replicate that same idea in 3D.  Then I thought a glass window or office may be a little ambitious - so I went with what we do at work often - producing display boards and hanging the work from thin nylon...  Well, virtually that is.

Virtual art exhibition, anybody?
This was built from about 5 variations of post-it note (ie. a divided plane and a variety of bends) model and by placing them a little imperfectly with some random rotation I managed to get something that looks a little more human.

Lighting and Rendering

Along with surfacing, one of the key features that LightWave has is its Viewport Rendering - or VPR for short.  This feature alone is worth its weight in gold, providing real-time rendered feedback as you adjust and move elements about in shot.  When I was surfacing I used this a lot to see the result of tweaks to bump maps, reflections and node-based materials.  As its a render, it also allowed me to preview my fish-eye camera, as well as depth of field and adjust as I needed.

New Style

All that photo-real style work does take a lot of effort in modeling, surfacing and rendering.  So, I decided after 20 days had passed I would swap my style and try something new and different to keep the work interesting...  I also wanted to see if I could make things faster to create.

A whole new style
For the next set of images, I went for an isometric-angled simplified design - creating machines I recall from my youth (and mostly the ones I wanted, not the ones I owned) in their iconic form and giving them a simple shading style.

Advantages here - I didn't have to worry about fine detail modeling, as I was after the shape and form of the machine and not an accurate model.  Keyboards could be simple blocks, icons and branding didn't have to be added to the model...  Though I decided to model the branding and place it next to the machine.

Taking a break from detail modeling and rendering for a while

The shading was all done by driving the surface luminosity (or incandescence in other applications) through a mix of occlusion shader and a gradient ramp driven by the surface slope to allow shading of curved surfaces.  The floor was a flat plane and simply used a radial gradient to create a 'spot light' style effect from the center.

That meant no need for lighting, calculating shadows - which then made render times a little faster to boot.

So yeh...

There's still 70+ days to go - its a fun project, though at times it feels like it overwhelms everything else around me when I know I have to complete something that night.  With work, time is tight so I squeeze in things when the day is done and I'm sitting in the office...

I'll do another update when I make any new changes in direction...  And obviously a post when I'm complete!  Feel free to check out the project so far HERE.

Friday 11 July 2014

Day 1 done - 800 bits - the challenge is officially on!

Well, day one has ended.  However I broke my own number one rule - not to be too ambitious and try to keep things simple and achievable.  It started out great, but then it managed to slide down into my usual 'perfectionism' trap, followed by a mind that keeps coming up with more ideas and going off track very quickly.

Thankfully I put the first image up - however with so many ideas I want to create, I let the first one become a huge daunting task that went haywire at the start.  So as day one finishes, its time to self-reflect and enforce some rules for myself so I don't get caught out again.  Essentially - its time to start breaking some habits when it comes to my own personal projects...

Reference and planning

I did actually do a lot of initial brainstorming and research...  I felt I was fully prepared, had everything I needed at least churning away in my cranium...


I did a handful of thumbnails - I even have an overall plan for some structured shot layouts when it comes to a few.  I finished the 3D model - great, so it should have just spun off from there and been done in just a couple of hours...


BUT...

I went and started to refine details, after which I modelled a few other items in for the next few images.  I had an idea in my head for the composition, but of course next thing I know, I'm deciding that I want to make something else because my brain is seeing possibilities - a dangerous way to work.

Generally, here's what happened...

What I did with the first image was to  

(a) decide to start with my first computer (that was the hardest part - truthfully!).

Then...

(b) I did a quick grab of reference images I've been collating and built a 3D model.

This was actually the easy (and quick) part of the project


That was actually real easy (heres a timelapse video showing the modeling process).  I then...

(c) collated a lot of items from other projects (my ZX Spectrum projects - Tapes, cables, cassette cases)

and built new textures for them based on classic ZX81 games I had back then.  Where time started to get wasted was when I...

(d) started to fumble about with my composition.

I moved cassette models, I tweaked the camera, I placed lights, I tested a few things...  It just became a case of fiddling way too much.  However I opted on two camera angles...  I rendered them out.


Finally...

(e) I did some post grading on them

... with a little lens distortion, abboration, vignette and grain - plus a dash of subtle sepiatone and compiled the images into my bubblegum card template.  Upload - and I was done...


until I...

(f) discovered I'd not paid attention to a few cable details

...which I wouldn't have had to worry about if I'd just done the machine on its own like I'd originally planned, and quickly adjusted my 3D scene, re-render and update the one online.

KISS

One of the challenges with CG is of course to meet deadlines, often under a lot of pressure.  Time pressure will be my daily job during the week, which in itself can take up almost 12 hours of my day when I include travel to and from home.  That's going to put a lot of stress on meeting that daily deadline.

Part of the plan is to definitely "keep it simple, stupid".  Composition will play a big part in this, and I've decided that I can definitely focus on key details that don't require me to model a vastly complex mesh.  As much as I'd love to build a fully detailed 3D object that I can render from any and all angles (such as this ZX Spectrum) I know just how long a project like that takes.

Keeping my compositions focused on the key subject matter using effects like Depth of field and building a themed layout will let me lower the complexity and hopefully retain the visual appearance I'm after.  That's just going to have to be how it is from now on - come up with some pre-prod at the start of the day just to clarify an idea and then stick to it.  There's no more first-day headache of changing direction as I go...

It doesn't actually take THAT long

I built my first new asset for day 1 - my very first home computer, the Sinclair ZX81. It was less then 40 minutes from start to end.  I limited the details down on the model - based on the composition not seeing them.  That shaved a lot of time down.

Textures are also mostly colours and bumps.  That in itself shaved plenty of time not having to manually paint up image maps.  (Here's that timelapse link again, as well as this lovely 22 second timelapse of the little work it took to surface the model (its so short, but it indicates just how easy and quick the process was))

Round, eh, I mean day 2 and onwards...

Day 2 I'm going to continue with this initial history.  I'll make use of models I've already built in the past rather then reinvent the wheel as it were.  Its going to be a test and a half, but there's 99 days to get good at it.

My process from here on...

I figured its worth noting a little about the process I've decided to go with here. 
Obviously I can't muck around like this every time I make an image.  So the general process from this day on will be

(a) Make sure once I'd done my pre-production thumbnails... I STICK with the one I plan to do and do not deviate.
(b) Reuse what I can from my own personal library (ie. my work, I'm not one to use free 'stock' off the net)
(c) Model anything new based on composition
(d) Render, grade and slap it together.
(e) Upload, and then prep up for the next one...

Its part (a) that's the clincher really.  We'll see how we go for tomorrows challenge...

Sunday 6 July 2014

800 Bits...

I've signed up for the 100 Days project, a challenge that pushes people to do something creative every day for 100 days (starts 11th July 2014).  Not surprisingly, being a somewhat over-grown nerd from the 80's and with my passion for CG, I've entitled my entry 800 Bits - 100 computer generated images inspired by the 80's computer and video game era - an era and culture that was my childhood.

This blog entry is really just to get the jumble in my head down onto 'paper' as it were and try sort things through...  So its a little bit of a verbal waffle, but please do feel free to read it nonetheless... lol!

Prepping up

The 100 day challenge is not a competition.  It states on the sites FAQ that its important to keep it simple and not to become to complex or technical.  If course you'd quite rightly assume 3D probably isn't quite as simple as it sounds...  I can imagine not only the pre-production (thumbnailing ideas, etc) but the production process will easily consume at least 3-4 hours of my time to achieve a final image (once its textured, composed, lit and rendered).  Obviously this means I must make sure I'm at least partially prepped up so I don't fizzle out after just a week or two.

It sounds easy enough...

The real challenge I've run into after deciding on this concept was whether I would be able to actually come up with 100 things to create images of, let alone worry about the artistic part of the project...  To help motivate ideas, I've made a creative decision to try and visualise each image in the style of collectable bubble gum cards.

And here I thought I'd thrown out all these cards...
Each card should contain not only a nice piece of rendered 3D artwork but also a short factoid about the content of the artwork itself - which at this stage I'm thinking may be nicer as a personal statement from a memory or feeling related to the artwork.  Essentially a short sentence about why I chose to create it and what does it mean to me.

Make a memory list

To get me ready for the 100 days ahead (starting end of this week) I'm making a list - a long list - of things I recall from my childhood.  My aim is to not to simply create a variety of 3D retro items one by one, its to create imagery based on memories - I want this to have some personal connection other then just an obsession to recreate old computing history...

100 days of 100 whats?

I had a home computer and fondly recall the hours after school that I'd spend programming it - what I did, I learnt from, the equipment I used...  Its all fond memories (and still hoarded away in boxes some 30 years later) just aching to be visualised.

I remember when I was a kid going into the department stores and playing games on the home computers that were on display, hanging out at David Reid Electronics (what was the major electronics retail chain here in New Zealand, before they sold it to the Dick Smith franchise) drooling over the latest cassette games and new home computer goodies.

At school there were always kids with LCD games on wristwatches and calculators, and the visits to skating rinks and ten pin bowling that often ended up being video game playing sessions.

Obviously the project is not just 100 individual items, and mixing in ideas and thoughts to that list is just as important as the items that I recall.  Where these ideas will take me, I'll discover over the 100 days...

Should there be a style?

A good question I asked myself was should I stick to a format and style? I could go for a specific artistic rendering style and look.  I could create the images based on a set layout.  However the more I think about 100 images all looking like the same style, the more uninteresting things become in my head.

I want the artwork to be interesting enough to keep people wanting to see what the next image will look like, and more importantly to not limit my creativity by enforcing rules.  I'm still tossing this idea around - I like the idea of a style/theme across all the designs (say, images in a classic pixel-art style or flat illustrative style) - but I also like the idea of variety and variation, like 100 small pieces of artwork from different artists...

It may be that I do a mix - different artwork, in small groups of specific styles. Pixel art style, isometric illustration style, etc.  The starting date is closing in - and while this may seem like a hard decision, I am also thinking of just letting my creativity decide for me based on what I feel will best represent the content.

Ready to roll...

I'd say I've got most of what I need thought through, but where the real creative side of the process comes is in the execution and production of each days piece of work.  Each day I am going to assume will be a mix of morning bus ride pre-production, and the rest of the time production.  I'll have to control my urges to be over-ambitious and keep things real - simple, clean and pretty.


Its going to be a good challenge to see how well I manage with this... But in the end, it will be worth the effort.  I'll post more to the blog when things are in full swing - if there's time obviously! lol!

Tuesday 6 May 2014

More CG retro goodness...

In our 3rd year 3D diploma, our students first assessment is to create a realistic rendered scene from photographic reference.  They've just been learning Mari, ZBrush, Renderman and Nuke - all tools that they utilise to produce the final image itself.

As always, I tend to find that there's not a lot of things I can do when these roll around.  The 3rd year is very self-directed, and by this level they should be very competent with their tools and require just a little guidance creatively now and again.  So - with my mid-life crisis still burning away at my soul, I decided to just do my own mini project with the inspiration again coming from my obsession for the 80's computer era.

Recent Acquisitions

If you saw my other post, I recently refurbished a C64 breadbin case.  I'd taken a few photos for that blog post, and I figured I'd use one as reference to create a small scene.  I was also inspired by other things around me, but more about that as we go...

Starting with something simple as reference

Getting started

Obviously the first rule is to not do more then you need to when working on a project.  For the C64, I created the visible corner rather then the whole machine in this case (no pun intended).  There were some background elements - a screw driver, a tablecloth and flat white paper.  I figured that I may toy with these a little and take some artistic license...


The screwdriver luckily was pretty simple.  I modeled the attachment for the end, but only the main shape rather then indent the head detail.  I expect this detail to be out of focus anyway, so there was no need to produce a high detail model.


Materials and textures

Textures in Maya aren't hard, but things such as the procedural textures Maya offers I've never been a big fan of - and I wanted to make use of a fine fractal to generate the molded plastic.  Maya just doesn't make it easy to achieve this quickly, creating odd skewing and weird mapping issues...

So I resorted to the approach of 'best tool for the job'.  One of the students also needed a fractal texture to apply to the bump of a plastic case as well...  Using Lightwave's 'texture image filter' plugin, I created large 8k images of small, clean fractal noise that we could use to add textured detail to the plastic.

I was inspired by work going on around my desk in the office, where air-con repair created a lot of plaster dust as ceiling tiles were moved...  That meant I also needed some dust along edges of the case grooves, and some more fractal variations for breaking up the surfacing subtly...  Using Lightwave's Surface baking camera and the UV map I'd generated, I baked out a few more textures I could use in Photoshop to paint up other maps.

Put a model in the oven, bake on high for 30 seconds...

Crud...

Another detail I wanted to add to my dusty concept was of course larger particulate matter.  Again, I made use of Lightwave's vertex based particle emitter to spray and randomly spread particles into grooves, edges of the case for placement of 'solids'.  Baking the final frame out to an object layer, I then used them to randomly clone a 'plaster particle' with variations onto each vertex.


When bought back into Maya, these aligned perfectly.

But what of that background?

I had a piece of black art-board sitting on my desk that was collecting dust from all the dust being generated...  That gave me the idea to use the board as part of my background...  Plus a bonus was that with a little wiping and shaking, I could slap the real art-board on a scanner to pull off realistic textures that I also used to add plaster streaks to the computers case as well.

A few small screws that I modeled and placed on this board added to the story behind the image.  The screws are perhaps a little higher detailed then they needed to be, but they were relatively quick to create (for this I used LightWave and its very useful lathe tool to create the thread)

Completely screwed...

The tablecloth - also using Lightwave (its nice to be able to work around multiple applications) - I created a cloth simulation for a subdivided mesh, then pushed the board geometry on it to wrinkle the cloth close to the edges of the board.  That I also baked out as a mesh for modification

I took that into ZBrush for touching up, and then textured it with 2 layered renderman shaders to simulate the tablecloth which had a shinier threaded pattern through it. I drove the mix of the two materials through a tiling damask pattern.

Setting up some of the background details

Finishing off

As I had done previously with the C64 dust particles, I repeated the same process with the cloth and art-board to add more details...

Background dusted up and ready for render

The same dusty smeared textures from the art-board I also threw onto the table cloth and C64 case to detail it more, then a quick adjustment of camera angles, some very simple lighting (primarily a large area light and a simple HDR environment) and DOF produced the finished image

Done and dusted as they say... Eh, I mean dusty

To be honest, I'm not 100% happy with it - it could do with work with the lighting - but its a project I enjoyed working through.  The benefits of doing something like this presents the occasional challenge, and its those challenges that encourage more learning of the tools and technology.

Wednesday 19 March 2014

Front projection - Maya, Nuke and free scripts

I'm again back teaching Nuke to students.  Nuke 8 has some great features - in particular, I'm now officially a big fan of the colour wheels and scopes for working with grading...  But enough about that...
Thanks to one of my students last year, I became aware of a great free Python script called Maya2Nuke.  It lets you set up your scene in Maya and then export it, along with animation information across to Nuke.  And it does it extremely well I might add, but not without a little massaging to get there...


I figured a general overview of what this is all about wouldn't hurt here.  Some of you may recognise the character above as being the police officer that stops a young James Kirk in the first JJ Abrams Star Trek movie.  Note that he didn't originally have a flare in his eye, but more about that later.  Its a frame that I sourced from here to use as a personal learning project.  No copyright breach intended (it was used for educational purposes)


Whats up, doc?

I'm running Maya 2014.  I follow the instructions for the script which says to place it in the user's Maya scripts folder.  It then says to import it into Maya from the command line...  But it just comes up and can't see anything in Maya.  Secondly, it also generates an error trying to retrieve frame numbers.  In Maya 2014, these are returned as floats (allowing for fractional frames).  The original script tries to treat these as integers, so a small tweak is needed to make the code work.

Open up the Python script in a script editor (Maya, Notepad++, etc).  Scroll down a few lines (line 29-ish), and there you'll see two lines retrieving start and end frames for the scene into two variables 'min' and 'max'.  Its a very simple fix - just typecast these to be integers.


Secondly, once the script is loaded into the script editor, it can just be run from here and performs as you'd expect.  However, saving it to the shelf in Maya will just save all that hassle.  Its now ready to go.


Front Projection - the what, why and how

Front projection mapping is all about creating the illusion of creating 3D motion from a flat 2D image.  It does this by projecting the image as seen through the camera onto the geometry in front of it.  Usually you can fake the illusion without front projection through a 2.5D approach using cards or planes with 'slices' of our scenery applied and placed different distances from our camera...

But while this may work just fine for distant elements (and it is quite common for cityscapes, etc), for closer details, the fact we are using cards starts to break the illusion as we notice the lack of perspective when moving in or around the scene.  Things just look like, well, flat images on cards.

To give our artwork real "depth", we can project the image onto very rough 3D geometry that represents the form of the artwork itself.  For example, rock formations with insets and outcrops and buildings that are close by...


Rough you say?

The idea of front projection is to make an image appear to have perspective.  This means we're really more concerned with an image appearing to change, and not worried about lighting and rendering artefacts common from rendering low-poly models.  For the Star Trek project, I went for a collection of primitive shapes with a little modification here and there.


However, for say a shot of a sky scraper in downtown Los Angeles, simple boxes and a few small extrudes are all that's needed.  Here's a very simple example of one that I did earlier as a test.

K.I.S.S - basic geo just gives our image some depth

We can get away with fairly low detailed geometry - though high detail may be used in circumstances where intricate details need to have some geometric form.


How do we do it

The approach I use is to simply load up the plate as a background plane in Maya's perspective viewport.  Before I proceed, I'll make sure that this fits properly (I've been caught before by not doing this step).

  1. Change the render size to the same dimensions as the picture.
  2. Make sure we've set the viewport to display the resolution gate (its the small blue ball icon in the VP's status bar).  You may need to adjust the Camera attributes - Fit Resolution Gate to a vertical or horizontal option if you can't see the whole image in the viewport.
  3. Open up the image plane attributes, and make sure that you click the Fit to camera resolution gate option to fit it properly.
  4. If you don't, you can end up with the image plane not filling the background and the alignment of your scene won't work correctly.


I adjust the camera so that the grid loosely (you don't need to be perfect here - though it can make life a little easier) looks about right and then break up the image into elements that represent the main forms I will see potentially changing with any camera movement.

Model and place the basic forms in the viewport to match the picture.  For shapes like faces, or rocky cliffs, you can generate a simple plane or box with multiple faces, and push/pull them to create the basic form as seen from the camera.  For the background sky, I'll often generate a very large sphere and cut away the faces to leave a slightly curved background object.

Make sure that you approximate the distances from the camera that the elements sit, align/resize/etc until they look right and you're set.  Don't worry if some of the geometry spills outside the camera's resolution gate.


If you want to see your front projection directly in Maya, you just have to wire in the surface colour using a Utility node (rather then a file node).  The Utility node is called, oddly enough, Projection.  Setting its Proj type to Perspective, adding an image and setting the camera options (Our camera with Resolution Gate being the setting) we can see the result as per the render above.

While you don't need to surface the objects at all for Nuke, there are times where you may want to render directly from Maya rather then go the whole compositing path...


Prepping up the images

Once I have the objects in place and everything looking clean and aligned, I'll break up the original image into multiple layers and paint out details as the elements go backwards...  The reason here is simply to make sure if the camera movement starts to reveal what is behind things, we don't want to see that the same picture of the items appear on the background elements...

Below is a quick example - I painted into the edges of the house on a layer I was using as a background plate.  This meant that the foreground building geometry didn't get any doubled-image issues.  Of course, you could also just do a complete sky replace with a separate BG image as well if you wanted to.


Ready to roll...

At this stage, we're ready to just export the scene to Nuke.

Run the Maya2Nuke script explained at the start of this article.
Select the items you want to export from the list.  If you can't see all items in your scene, look in the Type menu and click the All checkbox.
The Animation menu lets you also process and export animated items.
Under Edit, click the Calculate Maya data - it'll process animated frames, etc.
Then at the very bottom of the window, click the big Generator button.

If it worked out, you'll get a message saying so!


Putting it in NukeX

Just open up Nuke,  then click in the Node Graph and paste.  The project's nodes should appear, ready to be used.  The overall structure is very simple...  Our 3D objects (exported by Maya2Nuke as OBJ files) connected into a scene, and then that connected to a scanline render set to use the camera we exported from Maya.  A simple example below shows the basic structure of that sky scraper scene.


Simple 3D node set up - just add textures and cook.

You'll spot that the nodes are named to match the items in the Maya scene.  Unlike my quick examples, you should ideally make sure to give all of your items proper names that make sense.  To be honest, this should be a general practise so you can manage your projects efficiently in any CG application.

Something else to be VERY aware of is that if you use objects without renaming them for a project, OBJ's generated from Maya2Nuke will just overwrite any existing files.  I ran into this headache when a fairly complex example I'd created suddenly broke badly.  Lucky I just re-exported the Maya scene to overwrite the overwritten files again.

The only thing left to do in Nuke is add a few read nodes to get our images, attach these to Project3D nodes driven by the camera node.  And then attach them into the objects.  To animate your shot, you will need to get a second camera node - do not animate the one from Maya directly as this one is used to project the imagery onto the 3D geometry itself.

Oooh!  Look - a lens flare!


To this scene I separated the background and character into two scanline renders.  The reason for this was so I could grade and manipulate these two elements separately if I wished.  I also threw in an anamorphic flare streak I rendered from LightWave3D to add some animated detail to the eye of the character.  Here is a full image of the finished Node graph.  I've splattered a good collection of notes through it to hopefully explain what does what...

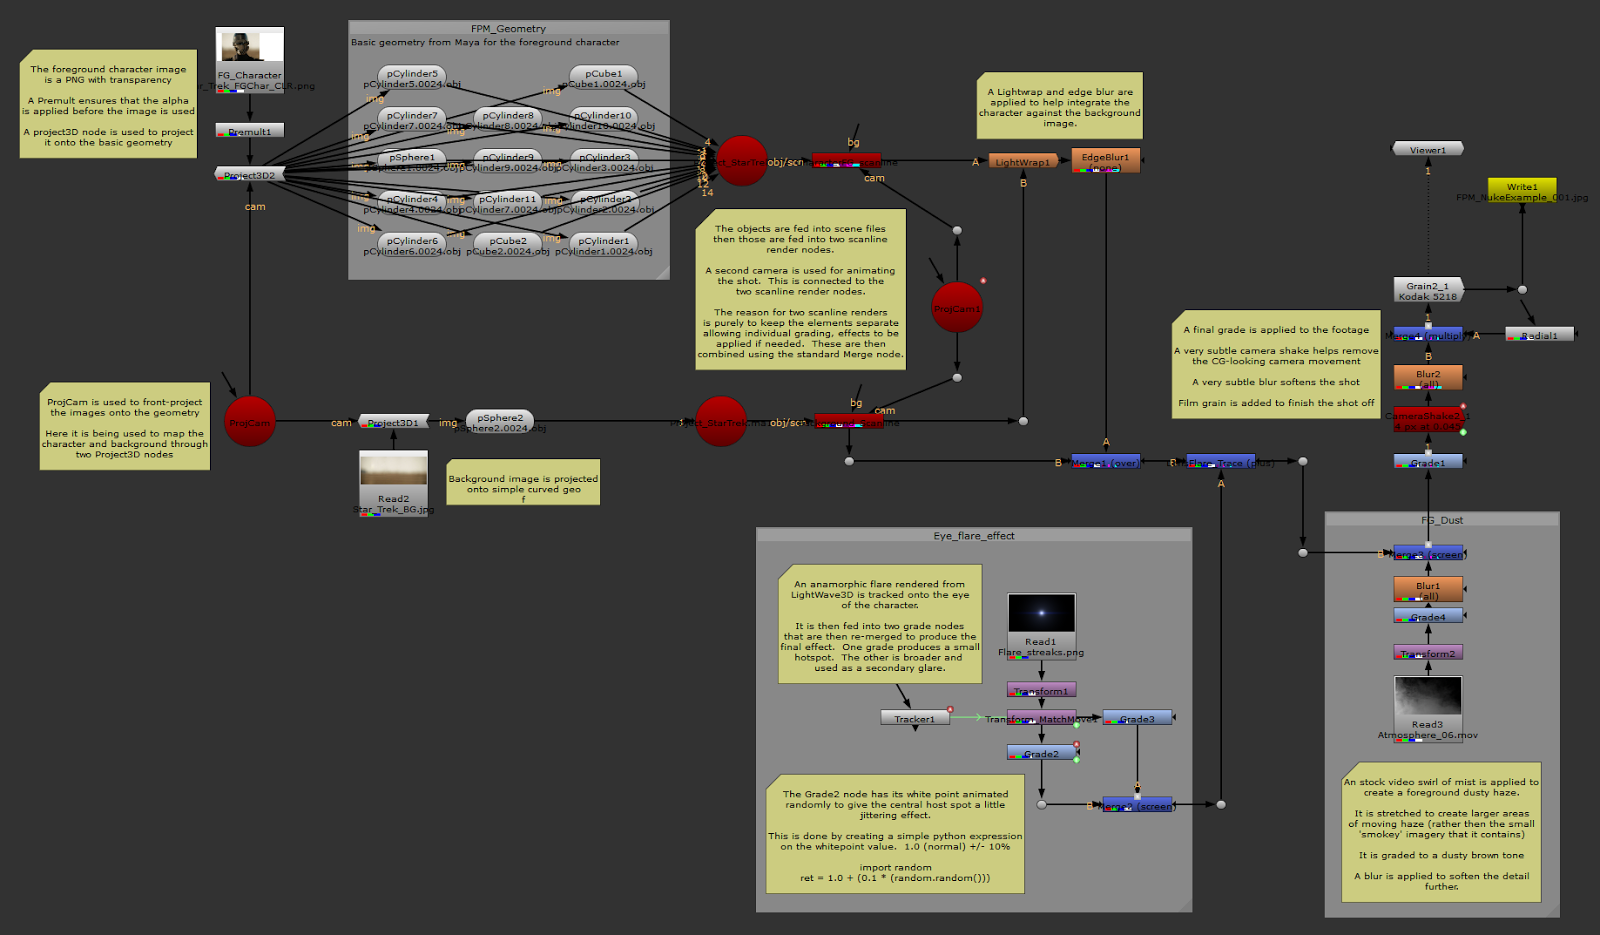
Notes, notes and more notes...

I didn't really have much of a story behind this scene (it was a mere exercise as a way to test Maya2Nuke, and to prep up for class with an interesting example of front projection), so there's nothing overly exciting going on other then the eye and a slow camera pan (which shows off the perspective effect nicely)


So there you have it - a fairly long-winded explanation and overview of front projection mapping between Maya and Nuke.  Its a load of fun, and lets you quickly create moving backdrops and elements from matte paintings, photo's and images.

Its well worth learning to do - front projection is something that's used throughout many a visual effects shot...  Hope that this article has been of interest to someone out there on the Interweb...

Friday 7 March 2014

TECH : Broken doesn't mean it can't be pretty...

Recently a local retro collector was giving away some of his excess gear - in his collection, he had an old Commodore 64 that was dead. It had been gutted - all of its chips had been removed and someone had soldered in a few random wires - and it was missing a few keys which had broken off.  While only my brother had Commodore (I was the "Sinclair" side of the family), the old "bread box" styling of the machine is iconic.  I also felt even if it didn't work, it could make for a nice display unit.

Not one - but two - but inside none...


On a little googling, I also saw a few small projects with Raspberry Pi emulators, old keyboards and a device called a Keyrah.  It is a small PCB that converts the Commodore keyboard input into a USB compliant USB keyboard.  I figure if I get the time, I may consider looking into projects like this at a later date.

Inspection - yup, its missing a few keys.

The machines arrived well packed inside an old Banana box.  I'd been sent two (I only expected one) - the Commodore 64, and a Commodore 64c that apparently would only produce a black screen and was rather messy inside as well.  The Commodore 64c's keyboard, however was intact.

Yes - I suspect that there may be something missing here

I'm not a big fan of the newer model casing that Commodore started to release its machines in (the later C128, Amiga 500's, etc).  While I could have just transplanted the keyboard across to the older box, its keys are light and the old bread box has great looking dark brown keys.  To keep the retro appeal, I just needed to replace those 3 that were missing with brown keys.

Washing away the dust

These machines have obviously been stored somewhere dusty - covered in grime and dust bunnies (or as they are otherwise known - clumped dust and hair) - a quick wash in some warm soapy water did wonders for the cases.  Obviously - I removed the keyboards and PCB's first!


So it was off to eBay...

I found a reseller who had classic brown C64 keys (refurbished, but in very good condition).  He also had pegs (the things that had snapped on the old keyboard, hence the missing keys) as well as springs.  So I ordered the 3 keys I was missing, a pack of springs and stems.

3 missing keys - now found (on eBay).  US$3.99 each


They arrived around a week later.  So - a little unscrewing (the keyboard PCB has almost 16-20 tiny screws hold it on) and some prying later, I managed to get the pegs in place, sit the springs on top and clip down the keys.

So many screws!


Viole!  Now looks much nicer.

Ta-da!  Now almost complete...


But something was still missing...


The C64 was missing its power LED.  This is a cheap 5mm Red LED - around $0.25 NZ cents.  I bought a couple (along with a green and a yellow one - Just because I could round it up to $1.00 - and because I thought its always handy to have some on hand)


At first I thought I would just clip it into the small black mount - it fits great - but then the clip is way too wide to go back into the case.


I placed the clip back in, inserted the LED and carefully (but forcefully) pushed it in with a pair or needle-nosed pliers.  The "click" meant it was in, and the case now looks complete.


Still one last detail... But for now...

There is still a missing black plastic cover that sits over the joystick and power connectors on the side, but from what I can tell this is really just a piece of black plastic with holes carefully punched into it.  Something for another time...

Something for another rainy day

Ready for display... or...

The case looks great (as long as I don't stare at the joystick connector "space" in the side) - its a classic design, and along with the ZX Spectrums (all 6 of them - lol!), the Atari 600 and the C64c - I now feel I need a display space.

I am definitely keen to make these two C64's at least do something more then sit pretty.  At a later date, I'll try my hand at throwing in a Keyrah interface.  If I'm feeling ambitious enough, a Raspberry Pi project may also be on the horizon...


UPDATE (April 2014)

Thanks to Terry 'tezza' Stewart, I now have that elusive plate.  It was definitely a lot different then I had imagined it to be (wasn't quite as simple as a 'plastic with holes')... A metal plate, with a large base folded flat to sit underneath the Circuit board.  However, that aside - I can now officially say that the case is complete...

Woohoo!  Nuff said...