
Showing posts with label production. Show all posts
Showing posts with label production. Show all posts
Wednesday, 17 June 2020
Monday, 10 September 2018

Saturday, 28 October 2017

Friday, 13 October 2017

I loaded up a rather complex project to test that had been set up to use VRay materials, and had been choking up and causing havoc on the render-farm here.
Wednesday, 16 August 2017

Monday, 7 November 2016

Saturday, 29 October 2016

One of my students asked me if I would be sharing these things on my blog - so yup, here we go - again... I have a few, but to keep these posts nice and short I'll start with just a couple.
Sunday, 17 January 2016

Sunday, 10 January 2016
Wednesday, 20 May 2015
Friday, 11 July 2014

Thankfully I put the first image up - however with so many ideas I want to create, I let the first one become a huge daunting task that went haywire at the start. So as day one finishes, its time to self-reflect and enforce some rules for myself so I don't get caught out again. Essentially - its time to start breaking some habits when it comes to my own personal projects...
Reference and planning
I did actually do a lot of initial brainstorming and research... I felt I was fully prepared, had everything I needed at least churning away in my cranium...
I did a handful of thumbnails - I even have an overall plan for some structured shot layouts when it comes to a few. I finished the 3D model - great, so it should have just spun off from there and been done in just a couple of hours...

BUT...
I went and started to refine details, after which I modelled a few other items in for the next few images. I had an idea in my head for the composition, but of course next thing I know, I'm deciding that I want to make something else because my brain is seeing possibilities - a dangerous way to work.Generally, here's what happened...
What I did with the first image was to
(a) decide to start with my first computer (that was the hardest part - truthfully!).
Then...
(b) I did a quick grab of reference images I've been collating and built a 3D model.
 |
| This was actually the easy (and quick) part of the project |
That was actually real easy (heres a timelapse video showing the modeling process). I then...
(c) collated a lot of items from other projects (my ZX Spectrum projects - Tapes, cables, cassette cases)
and built new textures for them based on classic ZX81 games I had back then. Where time started to get wasted was when I...
(d) started to fumble about with my composition.
I moved cassette models, I tweaked the camera, I placed lights, I tested a few things... It just became a case of fiddling way too much. However I opted on two camera angles... I rendered them out.

Finally...
(e) I did some post grading on them
... with a little lens distortion, abboration, vignette and grain - plus a dash of subtle sepiatone and compiled the images into my bubblegum card template. Upload - and I was done...

until I...
(f) discovered I'd not paid attention to a few cable details
...which I wouldn't have had to worry about if I'd just done the machine on its own like I'd originally planned, and quickly adjusted my 3D scene, re-render and update the one online.
KISS
One of the challenges with CG is of course to meet deadlines, often under a lot of pressure. Time pressure will be my daily job during the week, which in itself can take up almost 12 hours of my day when I include travel to and from home. That's going to put a lot of stress on meeting that daily deadline.Part of the plan is to definitely "keep it simple, stupid". Composition will play a big part in this, and I've decided that I can definitely focus on key details that don't require me to model a vastly complex mesh. As much as I'd love to build a fully detailed 3D object that I can render from any and all angles (such as this ZX Spectrum) I know just how long a project like that takes.
Keeping my compositions focused on the key subject matter using effects like Depth of field and building a themed layout will let me lower the complexity and hopefully retain the visual appearance I'm after. That's just going to have to be how it is from now on - come up with some pre-prod at the start of the day just to clarify an idea and then stick to it. There's no more first-day headache of changing direction as I go...
It doesn't actually take THAT long
I built my first new asset for day 1 - my very first home computer, the Sinclair ZX81. It was less then 40 minutes from start to end. I limited the details down on the model - based on the composition not seeing them. That shaved a lot of time down.Textures are also mostly colours and bumps. That in itself shaved plenty of time not having to manually paint up image maps. (Here's that timelapse link again, as well as this lovely 22 second timelapse of the little work it took to surface the model (its so short, but it indicates just how easy and quick the process was))
Round, eh, I mean day 2 and onwards...
Day 2 I'm going to continue with this initial history. I'll make use of models I've already built in the past rather then reinvent the wheel as it were. Its going to be a test and a half, but there's 99 days to get good at it.My process from here on...
I figured its worth noting a little about the process I've decided to go with here.Obviously I can't muck around like this every time I make an image. So the general process from this day on will be
(a) Make sure once I'd done my pre-production thumbnails... I STICK with the one I plan to do and do not deviate.
(b) Reuse what I can from my own personal library (ie. my work, I'm not one to use free 'stock' off the net)
(c) Model anything new based on composition
(d) Render, grade and slap it together.
(e) Upload, and then prep up for the next one...
Its part (a) that's the clincher really. We'll see how we go for tomorrows challenge...
Wednesday, 19 March 2014

Thanks to one of my students last year, I became aware of a great free Python script called Maya2Nuke. It lets you set up your scene in Maya and then export it, along with animation information across to Nuke. And it does it extremely well I might add, but not without a little massaging to get there...
I figured a general overview of what this is all about wouldn't hurt here. Some of you may recognise the character above as being the police officer that stops a young James Kirk in the first JJ Abrams Star Trek movie. Note that he didn't originally have a flare in his eye, but more about that later. Its a frame that I sourced from here to use as a personal learning project. No copyright breach intended (it was used for educational purposes)
Whats up, doc?
I'm running Maya 2014. I follow the instructions for the script which says to place it in the user's Maya scripts folder. It then says to import it into Maya from the command line... But it just comes up and can't see anything in Maya. Secondly, it also generates an error trying to retrieve frame numbers. In Maya 2014, these are returned as floats (allowing for fractional frames). The original script tries to treat these as integers, so a small tweak is needed to make the code work.Open up the Python script in a script editor (Maya, Notepad++, etc). Scroll down a few lines (line 29-ish), and there you'll see two lines retrieving start and end frames for the scene into two variables 'min' and 'max'. Its a very simple fix - just typecast these to be integers.

Secondly, once the script is loaded into the script editor, it can just be run from here and performs as you'd expect. However, saving it to the shelf in Maya will just save all that hassle. Its now ready to go.
Front Projection - the what, why and how
Front projection mapping is all about creating the illusion of creating 3D motion from a flat 2D image. It does this by projecting the image as seen through the camera onto the geometry in front of it. Usually you can fake the illusion without front projection through a 2.5D approach using cards or planes with 'slices' of our scenery applied and placed different distances from our camera...But while this may work just fine for distant elements (and it is quite common for cityscapes, etc), for closer details, the fact we are using cards starts to break the illusion as we notice the lack of perspective when moving in or around the scene. Things just look like, well, flat images on cards.
To give our artwork real "depth", we can project the image onto very rough 3D geometry that represents the form of the artwork itself. For example, rock formations with insets and outcrops and buildings that are close by...
Rough you say?
The idea of front projection is to make an image appear to have perspective. This means we're really more concerned with an image appearing to change, and not worried about lighting and rendering artefacts common from rendering low-poly models. For the Star Trek project, I went for a collection of primitive shapes with a little modification here and there.
However, for say a shot of a sky scraper in downtown Los Angeles, simple boxes and a few small extrudes are all that's needed. Here's a very simple example of one that I did earlier as a test.
 |
| K.I.S.S - basic geo just gives our image some depth |
We can get away with fairly low detailed geometry - though high detail may be used in circumstances where intricate details need to have some geometric form.
How do we do it
The approach I use is to simply load up the plate as a background plane in Maya's perspective viewport. Before I proceed, I'll make sure that this fits properly (I've been caught before by not doing this step).- Change the render size to the same dimensions as the picture.
- Make sure we've set the viewport to display the resolution gate (its the small blue ball icon in the VP's status bar). You may need to adjust the Camera attributes - Fit Resolution Gate to a vertical or horizontal option if you can't see the whole image in the viewport.
- Open up the image plane attributes, and make sure that you click the Fit to camera resolution gate option to fit it properly.
- If you don't, you can end up with the image plane not filling the background and the alignment of your scene won't work correctly.

I adjust the camera so that the grid loosely (you don't need to be perfect here - though it can make life a little easier) looks about right and then break up the image into elements that represent the main forms I will see potentially changing with any camera movement.
Model and place the basic forms in the viewport to match the picture. For shapes like faces, or rocky cliffs, you can generate a simple plane or box with multiple faces, and push/pull them to create the basic form as seen from the camera. For the background sky, I'll often generate a very large sphere and cut away the faces to leave a slightly curved background object.
Make sure that you approximate the distances from the camera that the elements sit, align/resize/etc until they look right and you're set. Don't worry if some of the geometry spills outside the camera's resolution gate.

If you want to see your front projection directly in Maya, you just have to wire in the surface colour using a Utility node (rather then a file node). The Utility node is called, oddly enough, Projection. Setting its Proj type to Perspective, adding an image and setting the camera options (Our camera with Resolution Gate being the setting) we can see the result as per the render above.
While you don't need to surface the objects at all for Nuke, there are times where you may want to render directly from Maya rather then go the whole compositing path...
Prepping up the images
Once I have the objects in place and everything looking clean and aligned, I'll break up the original image into multiple layers and paint out details as the elements go backwards... The reason here is simply to make sure if the camera movement starts to reveal what is behind things, we don't want to see that the same picture of the items appear on the background elements...Below is a quick example - I painted into the edges of the house on a layer I was using as a background plate. This meant that the foreground building geometry didn't get any doubled-image issues. Of course, you could also just do a complete sky replace with a separate BG image as well if you wanted to.

Ready to roll...

Run the Maya2Nuke script explained at the start of this article.
Select the items you want to export from the list. If you can't see all items in your scene, look in the Type menu and click the All checkbox.
The Animation menu lets you also process and export animated items.
Under Edit, click the Calculate Maya data - it'll process animated frames, etc.
Then at the very bottom of the window, click the big Generator button.
If it worked out, you'll get a message saying so!
Putting it in NukeX
Just open up Nuke, then click in the Node Graph and paste. The project's nodes should appear, ready to be used. The overall structure is very simple... Our 3D objects (exported by Maya2Nuke as OBJ files) connected into a scene, and then that connected to a scanline render set to use the camera we exported from Maya. A simple example below shows the basic structure of that sky scraper scene. |
| Simple 3D node set up - just add textures and cook. |
You'll spot that the nodes are named to match the items in the Maya scene. Unlike my quick examples, you should ideally make sure to give all of your items proper names that make sense. To be honest, this should be a general practise so you can manage your projects efficiently in any CG application.
Something else to be VERY aware of is that if you use objects without renaming them for a project, OBJ's generated from Maya2Nuke will just overwrite any existing files. I ran into this headache when a fairly complex example I'd created suddenly broke badly. Lucky I just re-exported the Maya scene to overwrite the overwritten files again.
The only thing left to do in Nuke is add a few read nodes to get our images, attach these to Project3D nodes driven by the camera node. And then attach them into the objects. To animate your shot, you will need to get a second camera node - do not animate the one from Maya directly as this one is used to project the imagery onto the 3D geometry itself.
 |
| Oooh! Look - a lens flare! |
To this scene I separated the background and character into two scanline renders. The reason for this was so I could grade and manipulate these two elements separately if I wished. I also threw in an anamorphic flare streak I rendered from LightWave3D to add some animated detail to the eye of the character. Here is a full image of the finished Node graph. I've splattered a good collection of notes through it to hopefully explain what does what...
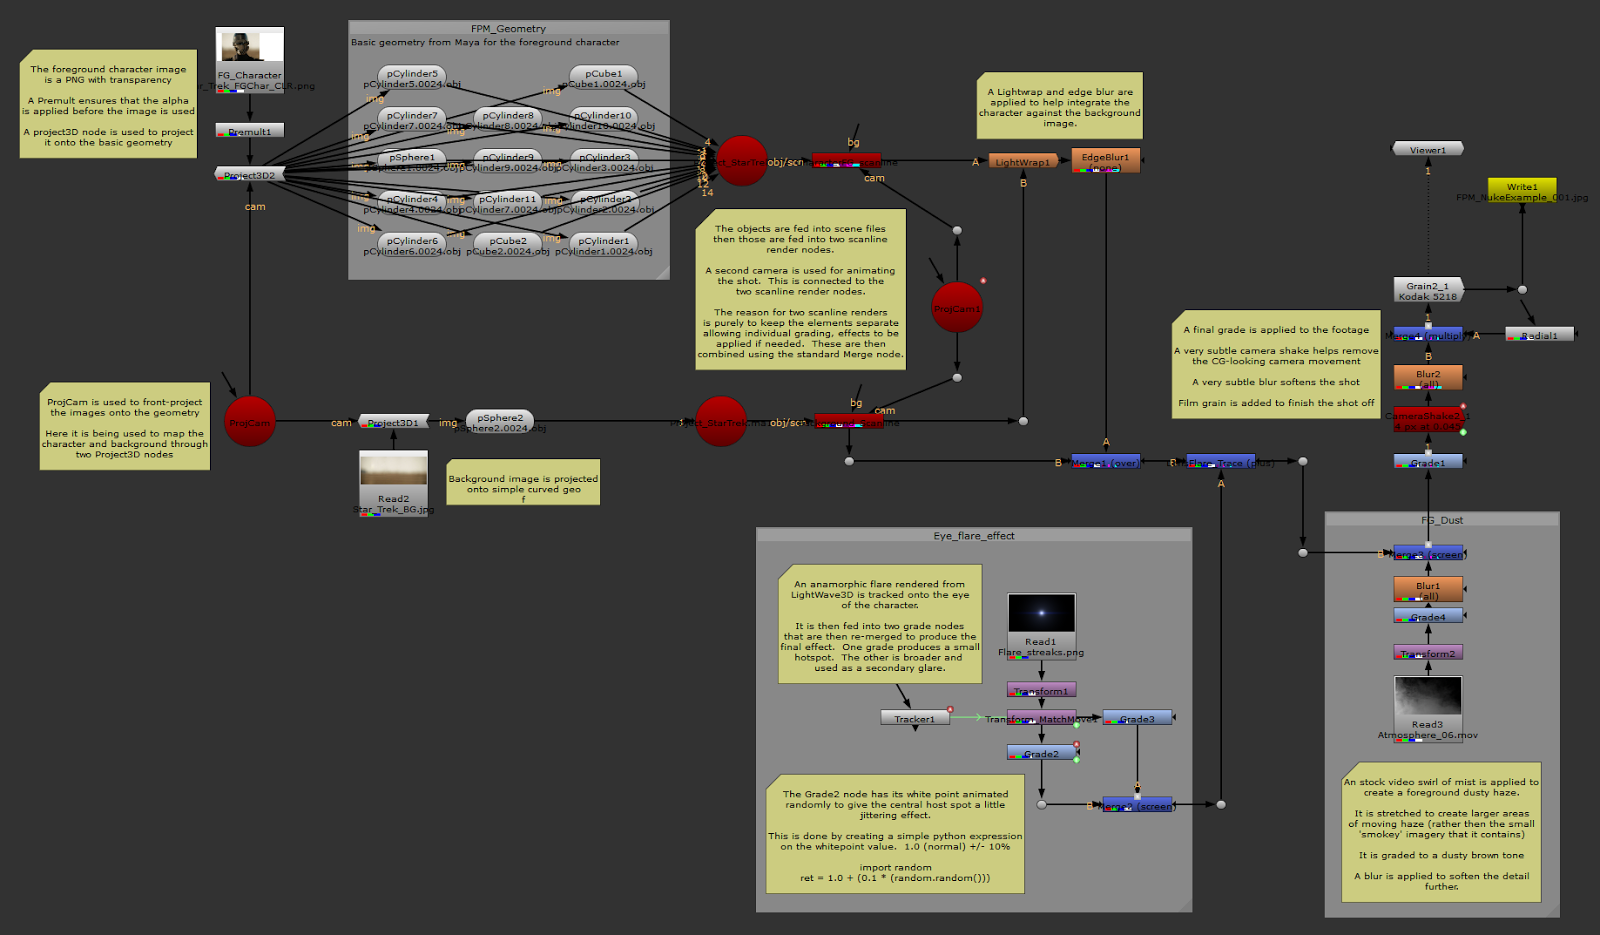 |
| Notes, notes and more notes... |
I didn't really have much of a story behind this scene (it was a mere exercise as a way to test Maya2Nuke, and to prep up for class with an interesting example of front projection), so there's nothing overly exciting going on other then the eye and a slow camera pan (which shows off the perspective effect nicely)

So there you have it - a fairly long-winded explanation and overview of front projection mapping between Maya and Nuke. Its a load of fun, and lets you quickly create moving backdrops and elements from matte paintings, photo's and images.
Its well worth learning to do - front projection is something that's used throughout many a visual effects shot... Hope that this article has been of interest to someone out there on the Interweb...
Saturday, 25 January 2014
 Figurines are a great inspiration (as I've said back on this blog entry), but something that is even more inspiring for me is the many art books I have here. Looking at concept art, model sheets and reading those stories that remind me why I love CG - its what keeps me driven and passionate.
In the last couple of months, I've gotten 3 - Pacific Rim : Mans, Machines and Monsters , Elysium : the art of the film and just recently Transformers : the art of Prime.
I felt a quick personal review would be a nice entry for the blog, and for those interested in these books. I like all three, but for those who were thinking about it - here's my personal take on each...
Pacific Rim : Man, Machine and Monsters

 |
| Small removable sheets (like the one on the left) are spread throughout |
I'm not sure if I should remove these (they are attached with easy-to-remove gum) or leave them. They sit over page artwork, and while I'm tempted to take them out - I'm also not sure where they would be stored (ie. to keep them with the book).
 |
| Great artwork, but those removable sheets (that blueprint) can get in the way. |
 |
| Visual Effects and Special effects have various storyboards. But could do with more imho. |
 |
| As expected, plenty of detail sketches and coloured artwork |
Overall, this book is well written, and its got plenty of artwork and concept material. To be honest, as much as I like this book, I do feel it could do with more art and design sketches. Many of the photo's and imagery I've seen on the special features of the Bluray, or online.
However, its still a good look at the movie itself along with its production and design work. I loved this movie, just for watching all that cool ass-kicking visual eye candy - its not a film I'd watch if I was after a meaningful and complex story however... lol!
Art of Elysium

This is a fairly wide book. Its a little awkward to browse through when sitting on my lap, but its a book that's well worth the cost if you're into the grungy design that Weta and Neill Blompkamp have bought to the cinema screen.
This book is very reminiscent of the District 9 art book I got a couple of years back at the Weta stand at a local NZ convention. Like that book, this one also features lots and lots of nice artwork, breaking the production right down to the small details such as the tattoo designs that the characters wore.
 |
| Right down to tattoo's, costumes and more - the books got plenty of great info... |
Overall, as I said, there's a lot of great material in here. A mix of written material, with a good dose of conceptual artwork and sketches, as well as photo's.
 |
| As you'd expect - weapons and ships feature throughout. |
 |
| The many, many sketches and paintings really show the amount of design that went on. |
I'm a fan of both of Neill's films. I love the style, the stories and the gritty nature of the films themselves - Seeing the artwork and reading about the process just increases my respect for the amount of work that went into these productions... Great stuff...
Transformers : The art of Prime

I'm a big fan of this animated show - and the book as well - its loaded with detailed images of characters, set designs, matte paintings and all the eye candy any self-respecting fan just has to see.
The overall dimensions (12.6 x 9.6 x 0.7 inches) make it a nice size that sits on your lap nicely without being too large or too small. The book has a nice matte cover, with the title text (and images on the back) in glossy print. If anything could have been improved on, it would (for me at least) have been a nice dust cover to protect the book itself...
Another thing I noted was that the cover, and the matte black paper that sits just inside of it are prone to picking up grease so if you're going to browse, make sure to clean those hands beforehand (you could say this for any book mind you)
The book is broken up into 3 sections on Characters & Props, Environments and Color and effects. Inside each section are chapters that break up the types of characters (ie. Autobots, Decepticons and Humans), locations and various effects and paintings.
 |
| Great glossy coloured print throughout the book. |
 |
| The book content is broken into parts, each with sub-chapters... |
A variety of conceptual art and sketches, renders, and illustrations with small paragraphs and comments inserted where they relate to the artwork are spread through the 200 glossy printed pages.
 |
| A good mix of details - model sheets, notes and colour art work. |
 |
| Good breakdown's of smaller details such as the transformation sequences. |
 |
| Plenty of model sheets and sketches everywhere. |
Added throughout the book are full interviews - from 3 to 5 pages, the interviews go into more depth with the core team behind the development of the show. There's a lot of interesting snippets of info within these, and of course a little more artwork to break apart the text.

With this book being mostly a collection of great artwork, I have to say out of the three its one of my favorite books. This is most likely influenced by the show being a completely CG animated one and the fact I'm a big fan...
All three are great reads. If you need more material to inspire you, check them out.
Saturday, 5 October 2013

When its a flying machine for a Swedish childrens show called Ljudhjältarna...
Late end of 2012, I was approached by film maker, director and editor/compositor Arvid Eriksson (whom I'd met through a colleague when creating a conceptual 3D space capsule image for an indie film pitch) to produce a 3D steam-punk styled airship for a Swedish childrens show. The plan - to create a 3D model that he could then import into Adobe Aftereffects and animate in post.
Arvid's a very talented director, producer, editor and compositor - and he's also a lot of fun and infectiously enthusiastic. Obviously, I just had to say yes - and hey, nothing says fun like a flying air ship that travels through outer-space... On top of that, the conceptual art we had been given had a stylised "cow" look to it - 4 hooves, rope tail and wings that formed the ears. This should be a blast...
 |
| The finished model as used in the opening titles |
Getting it started...
Based on the concept art, I produced a very low quality proxy model using LightWave3D's modeler. Exported out as an obj, this meant the model could be imported into AE by Arvid to animate and get his project blocked out quickly. |
| Rough out proportions, and something for the director to get started quickly. |
Taking it from there...
There were a few things to consider during this project when it came to building this model...
Obviously one was that it really couldn't be too poly heavy or texture heavy since it had to be importable into a compositing package. While most CG applications will quite happily render high poly detailed models, After Effects isn't exactly a full featured 3D rendering package - and that also meant a lot of internal custom shaders and texture mapping techniques I could use with my rendering tools would need to be instead based heavily on colour image maps and the general capabilities After Effects offered.
 |
| Most the detailing came from image maps, with small detailing modeled where needed. |
One other thing was that the ship wasn't going to need to hold up to extreme close-ups. That meant that detail models and precision texture mapping could be relaxed a little more then I'd normally need to with a more CG detailed project. There did still need to be at least some detail to make the machine look real. Details in the leg mechanics and wing/engine/rudder areas needed a little planning...
 |
| Details such as legs were low-poly - however the 'mechanics' had to still hold up. |
However, there was a close-up pulling back from the bridge to show the pilot flying the ship (video composited into the shot) - but this luckily was achievable with higher-res texture maps and minimal additional modeling (there was some, but only on details where the lower poly tessellation stood out in shot)
Luckily for me, the only real textures that were noticable at full HD was the overall wood on the main ships hull. To get this to look clean and sharp in a close-up, I simply created the texture map at 4096 rather then the original 2048 resolutions I'd originally been using.
 |
| Replacing the 2048 res with a 4096 higher quality image fixed close-up issues. |
Then it all changed.
After Effects is not a 3D animation tool - we knew that - and as Arvid's project went on, the limitations of what it could do started to become quite apparent. In particular, objects that would move a fair distance would render with artifacts (caused, I can only assume, by depth calculations messing up the back face culling). It also doesn't offer any real animation capabilities to add secondary motion - and this meant the model did have a rather "stiff" appearance.
Worse still - Adobe's decision to remove 3D model support suddenly meant that this project would need older versions of the software to be edited (and make any future changes quite difficult). With the newer releases of the software having no backward compatible replacement - Well... You can guess the answer on that one.
It was decided that we render it in a 3D application (in this case, LightWave3D) and instead plug the image sequences back into After Effects. This meant I could throw in more polys, and while I did add some more "detail", I still let the texture maps control a majority of the look and detailing.

 |
| Most the look of this section are image maps. The geometry is fairly simple |
It all worked out in the end
I had a real blast working on this project. In total, around 25-26 hours were spent with modeling, texturing and rendering on my end. Arvid's work can be seen below. Credits also go to David Giese, who also produced this project along with Arvid for Cinelandia and Scandinavian TV.
Make sure to check out both of these guys' websites to see some of the amazing commercial work that they do.
Ljudhjältarna, Title Sequence from Arvid Eriksson on Vimeo.
Subscribe to:
Posts (Atom)


