
Showing posts with label rendering. Show all posts
Showing posts with label rendering. Show all posts
Monday, 10 September 2018
Friday, 13 October 2017

I loaded up a rather complex project to test that had been set up to use VRay materials, and had been choking up and causing havoc on the render-farm here.
Wednesday, 29 June 2016

Saturday, 2 April 2016

It also had something the original didn't - curves - and curves are sexy...
Sunday, 17 January 2016

Tuesday, 6 May 2014
In our 3rd year 3D diploma, our students first assessment is to create a realistic rendered scene from photographic reference. They've just been learning Mari, ZBrush, Renderman and Nuke - all tools that they utilise to produce the final image itself.
As always, I tend to find that there's not a lot of things I can do when these roll around. The 3rd year is very self-directed, and by this level they should be very competent with their tools and require just a little guidance creatively now and again. So - with my mid-life crisis still burning away at my soul, I decided to just do my own mini project with the inspiration again coming from my obsession for the 80's computer era.

The screwdriver luckily was pretty simple. I modeled the attachment for the end, but only the main shape rather then indent the head detail. I expect this detail to be out of focus anyway, so there was no need to produce a high detail model.

So I resorted to the approach of 'best tool for the job'. One of the students also needed a fractal texture to apply to the bump of a plastic case as well... Using Lightwave's 'texture image filter' plugin, I created large 8k images of small, clean fractal noise that we could use to add textured detail to the plastic.
I was inspired by work going on around my desk in the office, where air-con repair created a lot of plaster dust as ceiling tiles were moved... That meant I also needed some dust along edges of the case grooves, and some more fractal variations for breaking up the surfacing subtly... Using Lightwave's Surface baking camera and the UV map I'd generated, I baked out a few more textures I could use in Photoshop to paint up other maps.

When bought back into Maya, these aligned perfectly.
A few small screws that I modeled and placed on this board added to the story behind the image. The screws are perhaps a little higher detailed then they needed to be, but they were relatively quick to create (for this I used LightWave and its very useful lathe tool to create the thread)
The tablecloth - also using Lightwave (its nice to be able to work around multiple applications) - I created a cloth simulation for a subdivided mesh, then pushed the board geometry on it to wrinkle the cloth close to the edges of the board. That I also baked out as a mesh for modification
I took that into ZBrush for touching up, and then textured it with 2 layered renderman shaders to simulate the tablecloth which had a shinier threaded pattern through it. I drove the mix of the two materials through a tiling damask pattern.
The same dusty smeared textures from the art-board I also threw onto the table cloth and C64 case to detail it more, then a quick adjustment of camera angles, some very simple lighting (primarily a large area light and a simple HDR environment) and DOF produced the finished image
To be honest, I'm not 100% happy with it - it could do with work with the lighting - but its a project I enjoyed working through. The benefits of doing something like this presents the occasional challenge, and its those challenges that encourage more learning of the tools and technology.
As always, I tend to find that there's not a lot of things I can do when these roll around. The 3rd year is very self-directed, and by this level they should be very competent with their tools and require just a little guidance creatively now and again. So - with my mid-life crisis still burning away at my soul, I decided to just do my own mini project with the inspiration again coming from my obsession for the 80's computer era.
Recent Acquisitions
If you saw my other post, I recently refurbished a C64 breadbin case. I'd taken a few photos for that blog post, and I figured I'd use one as reference to create a small scene. I was also inspired by other things around me, but more about that as we go... |
| Starting with something simple as reference |
Getting started
Obviously the first rule is to not do more then you need to when working on a project. For the C64, I created the visible corner rather then the whole machine in this case (no pun intended). There were some background elements - a screw driver, a tablecloth and flat white paper. I figured that I may toy with these a little and take some artistic license...The screwdriver luckily was pretty simple. I modeled the attachment for the end, but only the main shape rather then indent the head detail. I expect this detail to be out of focus anyway, so there was no need to produce a high detail model.
Materials and textures
Textures in Maya aren't hard, but things such as the procedural textures Maya offers I've never been a big fan of - and I wanted to make use of a fine fractal to generate the molded plastic. Maya just doesn't make it easy to achieve this quickly, creating odd skewing and weird mapping issues...So I resorted to the approach of 'best tool for the job'. One of the students also needed a fractal texture to apply to the bump of a plastic case as well... Using Lightwave's 'texture image filter' plugin, I created large 8k images of small, clean fractal noise that we could use to add textured detail to the plastic.
I was inspired by work going on around my desk in the office, where air-con repair created a lot of plaster dust as ceiling tiles were moved... That meant I also needed some dust along edges of the case grooves, and some more fractal variations for breaking up the surfacing subtly... Using Lightwave's Surface baking camera and the UV map I'd generated, I baked out a few more textures I could use in Photoshop to paint up other maps.
 |
| Put a model in the oven, bake on high for 30 seconds... |
Crud...
Another detail I wanted to add to my dusty concept was of course larger particulate matter. Again, I made use of Lightwave's vertex based particle emitter to spray and randomly spread particles into grooves, edges of the case for placement of 'solids'. Baking the final frame out to an object layer, I then used them to randomly clone a 'plaster particle' with variations onto each vertex.When bought back into Maya, these aligned perfectly.
But what of that background?
I had a piece of black art-board sitting on my desk that was collecting dust from all the dust being generated... That gave me the idea to use the board as part of my background... Plus a bonus was that with a little wiping and shaking, I could slap the real art-board on a scanner to pull off realistic textures that I also used to add plaster streaks to the computers case as well.A few small screws that I modeled and placed on this board added to the story behind the image. The screws are perhaps a little higher detailed then they needed to be, but they were relatively quick to create (for this I used LightWave and its very useful lathe tool to create the thread)
 |
| Completely screwed... |
The tablecloth - also using Lightwave (its nice to be able to work around multiple applications) - I created a cloth simulation for a subdivided mesh, then pushed the board geometry on it to wrinkle the cloth close to the edges of the board. That I also baked out as a mesh for modification
I took that into ZBrush for touching up, and then textured it with 2 layered renderman shaders to simulate the tablecloth which had a shinier threaded pattern through it. I drove the mix of the two materials through a tiling damask pattern.
 |
| Setting up some of the background details |
Finishing off
As I had done previously with the C64 dust particles, I repeated the same process with the cloth and art-board to add more details... |
| Background dusted up and ready for render |
The same dusty smeared textures from the art-board I also threw onto the table cloth and C64 case to detail it more, then a quick adjustment of camera angles, some very simple lighting (primarily a large area light and a simple HDR environment) and DOF produced the finished image
 |
| Done and dusted as they say... Eh, I mean dusty |
To be honest, I'm not 100% happy with it - it could do with work with the lighting - but its a project I enjoyed working through. The benefits of doing something like this presents the occasional challenge, and its those challenges that encourage more learning of the tools and technology.
Wednesday, 19 March 2014

Thanks to one of my students last year, I became aware of a great free Python script called Maya2Nuke. It lets you set up your scene in Maya and then export it, along with animation information across to Nuke. And it does it extremely well I might add, but not without a little massaging to get there...
I figured a general overview of what this is all about wouldn't hurt here. Some of you may recognise the character above as being the police officer that stops a young James Kirk in the first JJ Abrams Star Trek movie. Note that he didn't originally have a flare in his eye, but more about that later. Its a frame that I sourced from here to use as a personal learning project. No copyright breach intended (it was used for educational purposes)
Whats up, doc?
I'm running Maya 2014. I follow the instructions for the script which says to place it in the user's Maya scripts folder. It then says to import it into Maya from the command line... But it just comes up and can't see anything in Maya. Secondly, it also generates an error trying to retrieve frame numbers. In Maya 2014, these are returned as floats (allowing for fractional frames). The original script tries to treat these as integers, so a small tweak is needed to make the code work.Open up the Python script in a script editor (Maya, Notepad++, etc). Scroll down a few lines (line 29-ish), and there you'll see two lines retrieving start and end frames for the scene into two variables 'min' and 'max'. Its a very simple fix - just typecast these to be integers.

Secondly, once the script is loaded into the script editor, it can just be run from here and performs as you'd expect. However, saving it to the shelf in Maya will just save all that hassle. Its now ready to go.
Front Projection - the what, why and how
Front projection mapping is all about creating the illusion of creating 3D motion from a flat 2D image. It does this by projecting the image as seen through the camera onto the geometry in front of it. Usually you can fake the illusion without front projection through a 2.5D approach using cards or planes with 'slices' of our scenery applied and placed different distances from our camera...But while this may work just fine for distant elements (and it is quite common for cityscapes, etc), for closer details, the fact we are using cards starts to break the illusion as we notice the lack of perspective when moving in or around the scene. Things just look like, well, flat images on cards.
To give our artwork real "depth", we can project the image onto very rough 3D geometry that represents the form of the artwork itself. For example, rock formations with insets and outcrops and buildings that are close by...
Rough you say?
The idea of front projection is to make an image appear to have perspective. This means we're really more concerned with an image appearing to change, and not worried about lighting and rendering artefacts common from rendering low-poly models. For the Star Trek project, I went for a collection of primitive shapes with a little modification here and there.
However, for say a shot of a sky scraper in downtown Los Angeles, simple boxes and a few small extrudes are all that's needed. Here's a very simple example of one that I did earlier as a test.
 |
| K.I.S.S - basic geo just gives our image some depth |
We can get away with fairly low detailed geometry - though high detail may be used in circumstances where intricate details need to have some geometric form.
How do we do it
The approach I use is to simply load up the plate as a background plane in Maya's perspective viewport. Before I proceed, I'll make sure that this fits properly (I've been caught before by not doing this step).- Change the render size to the same dimensions as the picture.
- Make sure we've set the viewport to display the resolution gate (its the small blue ball icon in the VP's status bar). You may need to adjust the Camera attributes - Fit Resolution Gate to a vertical or horizontal option if you can't see the whole image in the viewport.
- Open up the image plane attributes, and make sure that you click the Fit to camera resolution gate option to fit it properly.
- If you don't, you can end up with the image plane not filling the background and the alignment of your scene won't work correctly.

I adjust the camera so that the grid loosely (you don't need to be perfect here - though it can make life a little easier) looks about right and then break up the image into elements that represent the main forms I will see potentially changing with any camera movement.
Model and place the basic forms in the viewport to match the picture. For shapes like faces, or rocky cliffs, you can generate a simple plane or box with multiple faces, and push/pull them to create the basic form as seen from the camera. For the background sky, I'll often generate a very large sphere and cut away the faces to leave a slightly curved background object.
Make sure that you approximate the distances from the camera that the elements sit, align/resize/etc until they look right and you're set. Don't worry if some of the geometry spills outside the camera's resolution gate.

If you want to see your front projection directly in Maya, you just have to wire in the surface colour using a Utility node (rather then a file node). The Utility node is called, oddly enough, Projection. Setting its Proj type to Perspective, adding an image and setting the camera options (Our camera with Resolution Gate being the setting) we can see the result as per the render above.
While you don't need to surface the objects at all for Nuke, there are times where you may want to render directly from Maya rather then go the whole compositing path...
Prepping up the images
Once I have the objects in place and everything looking clean and aligned, I'll break up the original image into multiple layers and paint out details as the elements go backwards... The reason here is simply to make sure if the camera movement starts to reveal what is behind things, we don't want to see that the same picture of the items appear on the background elements...Below is a quick example - I painted into the edges of the house on a layer I was using as a background plate. This meant that the foreground building geometry didn't get any doubled-image issues. Of course, you could also just do a complete sky replace with a separate BG image as well if you wanted to.

Ready to roll...

Run the Maya2Nuke script explained at the start of this article.
Select the items you want to export from the list. If you can't see all items in your scene, look in the Type menu and click the All checkbox.
The Animation menu lets you also process and export animated items.
Under Edit, click the Calculate Maya data - it'll process animated frames, etc.
Then at the very bottom of the window, click the big Generator button.
If it worked out, you'll get a message saying so!
Putting it in NukeX
Just open up Nuke, then click in the Node Graph and paste. The project's nodes should appear, ready to be used. The overall structure is very simple... Our 3D objects (exported by Maya2Nuke as OBJ files) connected into a scene, and then that connected to a scanline render set to use the camera we exported from Maya. A simple example below shows the basic structure of that sky scraper scene. |
| Simple 3D node set up - just add textures and cook. |
You'll spot that the nodes are named to match the items in the Maya scene. Unlike my quick examples, you should ideally make sure to give all of your items proper names that make sense. To be honest, this should be a general practise so you can manage your projects efficiently in any CG application.
Something else to be VERY aware of is that if you use objects without renaming them for a project, OBJ's generated from Maya2Nuke will just overwrite any existing files. I ran into this headache when a fairly complex example I'd created suddenly broke badly. Lucky I just re-exported the Maya scene to overwrite the overwritten files again.
The only thing left to do in Nuke is add a few read nodes to get our images, attach these to Project3D nodes driven by the camera node. And then attach them into the objects. To animate your shot, you will need to get a second camera node - do not animate the one from Maya directly as this one is used to project the imagery onto the 3D geometry itself.
 |
| Oooh! Look - a lens flare! |
To this scene I separated the background and character into two scanline renders. The reason for this was so I could grade and manipulate these two elements separately if I wished. I also threw in an anamorphic flare streak I rendered from LightWave3D to add some animated detail to the eye of the character. Here is a full image of the finished Node graph. I've splattered a good collection of notes through it to hopefully explain what does what...
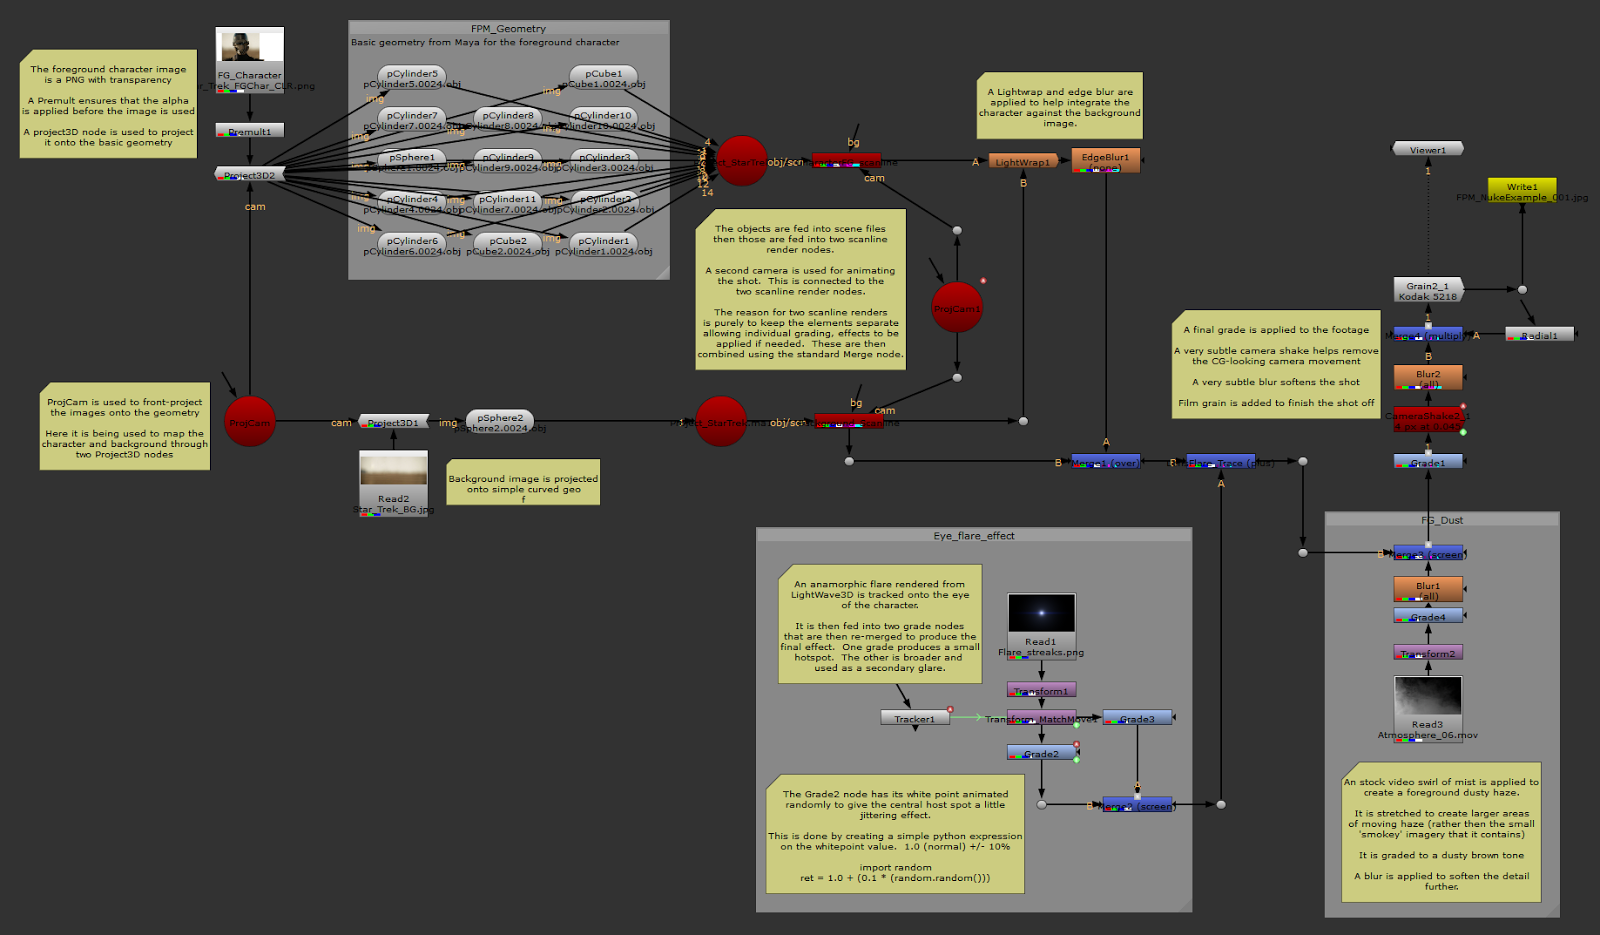 |
| Notes, notes and more notes... |
I didn't really have much of a story behind this scene (it was a mere exercise as a way to test Maya2Nuke, and to prep up for class with an interesting example of front projection), so there's nothing overly exciting going on other then the eye and a slow camera pan (which shows off the perspective effect nicely)

So there you have it - a fairly long-winded explanation and overview of front projection mapping between Maya and Nuke. Its a load of fun, and lets you quickly create moving backdrops and elements from matte paintings, photo's and images.
Its well worth learning to do - front projection is something that's used throughout many a visual effects shot... Hope that this article has been of interest to someone out there on the Interweb...
Thursday, 2 January 2014

(You can view all my posts on this project here)
Just adding a little dutch bank to the camera, a few texture tweaks... I ended up with this image. A classic moment - playing Manic Miner in a dark room, with the sunny day outside being blocked by the bedroom curtains. Just like it was back in the 1980's...
 |
| Done... |
 |
| Mix-n-match |
Getting the angle right...
As for the camera - I wasn't really sure just where I was going to go with it. In my original "finished" render, the camera was pretty much straight on. It looked ok, but it felt a little too dull and uninteresting. I decided to just throw on a Golden Spiral guide and used the inward spiral to take the viewer towards the focus of the game itself. |
| Composition guides can be useful tools |

Tweaked a few elements...
I did tweak a few small things in here. Some positioning of elements for one - the data recorder I actually moved forward (and slightly scaled up) to subtly influence the perspective of the shot. The screen, while its not obvious, has a very fine dark band that dulls the pixels (across that creature/green platform) to create the effect often common with the scan line on TV's when filmed or photographed.In this image below, I've cranked the effect up to make it more obvious - It was simply a soft black block blended with an Overlay to deepen the image...
 |
| The effect - though more exaggerated in this example then the final version |
I'm done and dusted... Honest... Well...
So, for now I'm signing this project off. In reality, I'm more then likely to return to this now and again and do more "fiddling" but til then its time to consider new projects. Such as looking at the real thing - given my brand new stash I recently picked up (as seen below). |
| Keep with the virtual? Perhaps just go for the Physical... |
Until next post...
Monday, 30 December 2013

As part of the pitch, to get funding (which was relatively low) it was important to show that producing Space effects were going to be achievable. In this case, part of the story revolved around astronauts in a damaged old space capsule - so a concept image showing the ability to produce reasonably good CG was needed to prove that point.
This is the image that I completed for the pitch. Its based on a Russian Soyuz capsule, featuring a Swedish flag (since the director was Swedish) and orbiting an image of the earth. An aspherical lens was simulated to create that slight optical distortion, and a lot of additional glare and detailing were finished in post (which you'll see as you read this blog article).
 |
| Ready for launch... Ahem, I mean pitch... |
Given that the time frame was short to get the pitch submitted (as in a day or two - no pressure, honestly!) I built and rendered a 3D Soyuz-styled capsule with basic textures.
 |
| Basic capsule and background plane |
 |
| Basic textures were painted up |
 |
| All those bolts, etc - when seen on the render, perhaps a little too ambitious. |
 |
| From basic render, to finished image (mostly done in PS) |
Unfortunately the pitch didn't get accepted as a whole, but this small project - like most small projects I tend to get - was a lot of fun and a chance to create something I would have never thought about doing...
Saturday, 5 October 2013

When its a flying machine for a Swedish childrens show called Ljudhjältarna...
Late end of 2012, I was approached by film maker, director and editor/compositor Arvid Eriksson (whom I'd met through a colleague when creating a conceptual 3D space capsule image for an indie film pitch) to produce a 3D steam-punk styled airship for a Swedish childrens show. The plan - to create a 3D model that he could then import into Adobe Aftereffects and animate in post.
Arvid's a very talented director, producer, editor and compositor - and he's also a lot of fun and infectiously enthusiastic. Obviously, I just had to say yes - and hey, nothing says fun like a flying air ship that travels through outer-space... On top of that, the conceptual art we had been given had a stylised "cow" look to it - 4 hooves, rope tail and wings that formed the ears. This should be a blast...
 |
| The finished model as used in the opening titles |
Getting it started...
Based on the concept art, I produced a very low quality proxy model using LightWave3D's modeler. Exported out as an obj, this meant the model could be imported into AE by Arvid to animate and get his project blocked out quickly. |
| Rough out proportions, and something for the director to get started quickly. |
Taking it from there...
There were a few things to consider during this project when it came to building this model...
Obviously one was that it really couldn't be too poly heavy or texture heavy since it had to be importable into a compositing package. While most CG applications will quite happily render high poly detailed models, After Effects isn't exactly a full featured 3D rendering package - and that also meant a lot of internal custom shaders and texture mapping techniques I could use with my rendering tools would need to be instead based heavily on colour image maps and the general capabilities After Effects offered.
 |
| Most the detailing came from image maps, with small detailing modeled where needed. |
One other thing was that the ship wasn't going to need to hold up to extreme close-ups. That meant that detail models and precision texture mapping could be relaxed a little more then I'd normally need to with a more CG detailed project. There did still need to be at least some detail to make the machine look real. Details in the leg mechanics and wing/engine/rudder areas needed a little planning...
 |
| Details such as legs were low-poly - however the 'mechanics' had to still hold up. |
However, there was a close-up pulling back from the bridge to show the pilot flying the ship (video composited into the shot) - but this luckily was achievable with higher-res texture maps and minimal additional modeling (there was some, but only on details where the lower poly tessellation stood out in shot)
Luckily for me, the only real textures that were noticable at full HD was the overall wood on the main ships hull. To get this to look clean and sharp in a close-up, I simply created the texture map at 4096 rather then the original 2048 resolutions I'd originally been using.
 |
| Replacing the 2048 res with a 4096 higher quality image fixed close-up issues. |
Then it all changed.
After Effects is not a 3D animation tool - we knew that - and as Arvid's project went on, the limitations of what it could do started to become quite apparent. In particular, objects that would move a fair distance would render with artifacts (caused, I can only assume, by depth calculations messing up the back face culling). It also doesn't offer any real animation capabilities to add secondary motion - and this meant the model did have a rather "stiff" appearance.
Worse still - Adobe's decision to remove 3D model support suddenly meant that this project would need older versions of the software to be edited (and make any future changes quite difficult). With the newer releases of the software having no backward compatible replacement - Well... You can guess the answer on that one.
It was decided that we render it in a 3D application (in this case, LightWave3D) and instead plug the image sequences back into After Effects. This meant I could throw in more polys, and while I did add some more "detail", I still let the texture maps control a majority of the look and detailing.

 |
| Most the look of this section are image maps. The geometry is fairly simple |
It all worked out in the end
I had a real blast working on this project. In total, around 25-26 hours were spent with modeling, texturing and rendering on my end. Arvid's work can be seen below. Credits also go to David Giese, who also produced this project along with Arvid for Cinelandia and Scandinavian TV.
Make sure to check out both of these guys' websites to see some of the amazing commercial work that they do.
Ljudhjältarna, Title Sequence from Arvid Eriksson on Vimeo.
Sunday, 22 September 2013

This retro 80's project is just that - and what's helping keep me on track is actually having the machines here next to me, which in turn inspires me to recall that childhood where I started my journey into computing.
So what have I been up to since my last post? Well, continuation of that asset building to get together materials to produce a final rendered result. With the cassette and cases all sorted and looking relatively good, a ZX Spectrum computer and some Atari game cartridges already done, its those last few peripherals that I need to load up and play my games that have to be done.
"From Russia...", ahem, I mean cassette to computer, "with love."
Obviously there has to be a way to feed that lovely magnetic data across, and in this case its with mono 3.5mm cables. While these aren't finalised (textures/materials still need work), I decided to do a quick test render with the cassettes...
You may be wondering what that whole "Bedrooms to billions" tape is about. Well, its not a game from the 1980's, but an upcoming documentary taking a historical look at the rise of the gaming industry in the United Kingdom where kids (like myself) could be game developers. Nowadays, not so easy to do with huge studios and billions of dollars floating around... Apart from perhaps the mobile gaming market, where indie games are still a possibility. But I digress...
The cables are rigged up with a simple skeleton to allow me to bend, twist and curl them around. Its important to be fairly flexible (no pun intended) with these assets so that I have options for a final composition...

On the subject of cables, I also made a start on the necessary RF cabling. Yes, back in the day tuning in a channel on the TV set was the equivalent of a computer monitor. Obviously being an RF (radio frequency) meant that the computers output would interfere with the neighbours TV reception...
 |
| RF plugs - just a little more tweaking to go... and a cable (obviously) |
Watch and behold - ahem, that all important TV set
You would be surprised at just how annoying it is to try and find a decent side-on photograph of a small 14 inch television set from the 1980's using a google image search. In the end I needed to develop my own model sheets for a classic small television through a mixture of reference photo's and some bounding box measurements from articles online for televisions.
 |
| "Roll your own" - TV model sheet, that is... |
What I did end up producing from a few images was something that looks a little more 1990's then 1980's - however that's not to say that I'd be creating a scene from the 80's - just a scene showing old computer tech being set up...
But lets keep it real
I did find one exceptionally good website while browsing, and for anybody wanting to learn more about obsolete television technology, then the obsolete telly museum blog is a must-read. I took another look at what televisions of that 1980's era were like, and today just built a whole new TV from scratch.Once the key elements were noted down (curved CRT tubes, framed screens and the speaker/channel/volume controls on the left side (about 1/5th of the width of the TV casing)) the whole model came together in a couple of hours.
 |
| Before we had LCD, LED or Plasma... We had CRT. |
Again, like the cables, the TV is still a WIP when it comes to textures and materials - but its one step closer to getting this project to completion...
Just making sure to follow through is the key...
Subscribe to:
Posts (Atom)


